


Welcome back to another Stamp Review Crew blog hop. The Stamp Review Crew is a group of Stampin' Up! demonstrators from around the world that get together on the 1st and 3rd Monday of each month for a blog hop. Each hop we showcase one stamp set and show you just how much you can do with it. Get ready for lots of inspiration and lots of reasons to use (or buy😊) this stamp set! Currently you are visiting Lou Kitzelman on the Sunshine Coast, Australia. Hi!
For this hop we are featuring the free Sale-a-bration products.


I have used this gorgeous Organdy Ribbon Combo pack (free if you spend over $90 AUD) and ....


As I am writing this post (at the last minute) it has just dawned on me that we are supposed to be featuring a stamp set from the Sale-a-bration promotion. I am actually using framelits and ribbon .... oops ..... you'll have to forgive that mistake! Here are the fun adapted easel cards that I came up with.

I have used this gorgeous Organdy Ribbon Combo pack (free if you spend over $90 AUD) and ....


.... the fabulous TeaTime framelits (free if you spend over $180 AUD) which coordinate with the Tea Together stamp set in the Occasions catalogue.


They are perfect for these adapted easel cards. I wanted the pot and cup to look like it was on a table. You might have seen my first version here. I tweaked the card fold until I was happy with it - you'll find the details at the end of this post.

The Gingham Gala DSP comes in the same 5 colours as the free Organdy ribbon pack so it just makes putting together a card a breeze.

The stamp set has this fabulous rose that I just had to colour with Stampin' Blends. Makes a perfect accent for the inside of the card.

The Itty Bitty Birthdays stamp set has lots of fab sentiments to use on the cards. And of course the card folds flat to fit into an envelope too.

Before I came up with my finalised card fold, I tried it with the score lines in a different place. Not quite as I had hoped but still pretty. I love this Daffodil Delight version.


And why not do a Balmy Blue version too???

Here's what you need to know to make the adapted easel card. I have 2 versions for your - one for Letter size cardstock and one for A4.
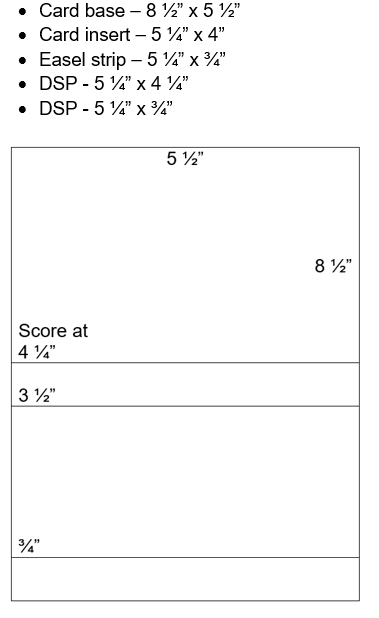

1. Fold on each score line and crease with a bone folder.
2. Adhere the large DSP piece to the card front and refold and score.
3. Adhere the card insert inside the card. Trim if needed.
4. Adhere the DSP strip to the easel strip. Add ribbon if desired then attach to the front inside of the card with foam adhesive strips.
5. Attach the die cut elements near the first score line so that they stand upright.
6. For added strength you can add a raised element near the easel strip inside the card. This will allow the folded edge to wedge in between the two raised pieces.
Have fun with this design and experiment with different die cut elements.
Make sure you hop around to see what all the crew have done with this gorgeous stamp set. Next up is Debra.
Lou

Product List


 Designer Series Paper")


Oh my I suddenly feel the need to put the kettle on! These are absolutely delightful! Just beautiful!
ReplyDeleteBeautiful Lou! i love these little table settings. Thanks for the instructions. Charlet
ReplyDeleteHow adorable is this?! I love how you turned an easel card into a table look - so beautiful. And the gingham paper just works perfectly.
ReplyDeleteOh my goodness, Lou, these easel cards are fabulous! Love how you featured the coordination between the Occasions catalog and the Sale-A-Bration offerings.
ReplyDeleteI feel like such an airhead! I love all three of your cards! But, then again, I LOVE this bundle, ( yes, I know it's NOT a bundle!). Anyhoo! I'm confused I don't understand 4,5, & 6, in your directions. I wanted to make these as a set for a birthday gift in a box, I thought I'd better talk to you! I assure you, I'm NOT trying to be funny, I just didn't understand the directions? Could you Please, clarify? I'd love to CASE these as they are very pretty cards! Thank you for sharing!
ReplyDeleteHi Gloria. I am glad you love these cards. It might help to explain steps 4, 5 and 6 if you look at the pictures of the Lemon Lime Twist card - they show the card on the side so it is easier to see how I put in what I called the easel strip. In step 4 I taped DSP onto the whisper white strip to give it more strength, added ribbon then added it to the inside of the card, close to the edge. I raised it on foam adhesive strips so that the easel part can rest against it. If you look at the pic of the inside of the card you will see that I also added a rose on foam adhesive strips so that the easel part sits in between that and the strip. It also might help if you cut and score the base card on scrap card, fold it and then you will have a model and be easily able to see how the card works. Please contact me if I can help further. x
DeleteReally beautiful!
ReplyDeleteAmazing!!! Love, love, love this style of fold! (Thanks for sharing the instructions!) Kelly x
ReplyDelete