Welcome to the first blog hop for ESAD in 2025.
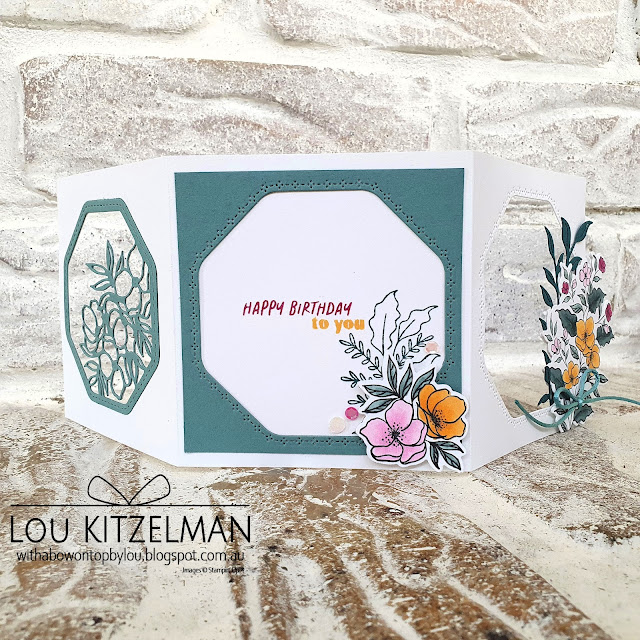
For this hop we are showcasing products from the new Jan-April 2025 Mini Catalogue and Sale-a-bration brochures from Stampin' Up!. I've made a Tri-Fold Card using the Memorable Blooms bundle and the FREE Day To Celebrate stamp set.
I feel like I have been creating this card for weeks. While I had the basic concept, the design evaded me. I experimented with different coloured cardstock, Designer Series Paper and lots of other products and nothing really worked. I was doing everything I vowed not to do in my Crafting New Year's promise to myself which was to enjoy my crafting sessions and if it wasn't working, just leave it and come back to it. Forcing creativity results in a tortured result! So being the mature adult I am ( ..... after 2 minor crafting tantrums and 1 full on 3 year old-esque meltdown) I stepped away for a few hours and an idea just popped into my head. I love that I came up with a simple way to make the most of the borders on the hexagon die cuts. Perfect for my upcoming classes!
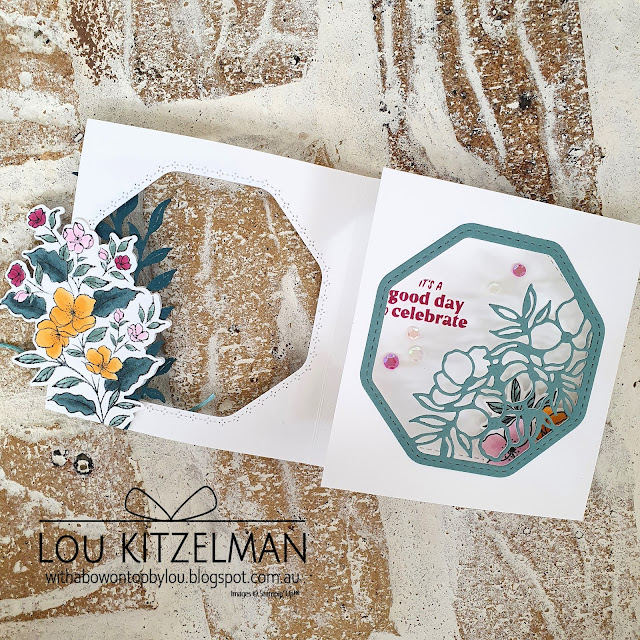
Here are few pics so you can see it open from a few angles.
The card is half an A4 cut lengthways - 10.5 cm x 29.7 cm, scored along the long side at 10 and 20 cm. The Lost Lagoon piece is 9.5 x 9.5 cm. When you fold the card you will notice that the 3rd section is slightly narrower. This allows it to fit inside neatly without buckling the card. Make sure to orientate your card so this narrower piece is on the right and gets tucked inside.
The hexagon cut from the front becomes the inside centre panel. I like to fold my card, position the die and hold in place with repositionable tape, then unfold and die cut. Refold it to work out where to place the detailed floral hexagon, tape in place, unfold and die cut.
The blooms on the front are coloured with Stampin' Blends. They tend to bleed through to the back so I wanted to cover that. You could simply die cut another to match from Basic White cardstock and adhere on the back. If you have some time, you might like to give mirror image stamping a go to add to your design. I don't have any pics of this step as I have been struck down with a virus and am finishing this post in between naps, sneezing and coughing fits. I found this great video by Connie Stewart who shows you how to do this perfectly. You can see her post here.
Lou
To purchase the products I've used today you can click any of the direct links in the text above, the 'Click Here' graphic or the 'Shop Online' tab at the top of this page. They will take you directly to my online store, where you are only minutes away from getting products delivered straight to you door.
Get them while stocks last here.
Check all of the Online Exclusive products.
Birthday Card Organizer Kit - Wonderful gift!
$44 AUD, includes all you need to create 12 cards and the organizer. And I mean everything - even adhesive is included!
Check out my Tutorial Collections and individual tutorials.


What a beautiful design Lou x
ReplyDeleteLove this Lou, I have been playing with this set so much over the holidays... AND you have shown me another way to use this very versatile set <3 Thanks for the inspiration. Cheers Shaz
ReplyDeleteWell all that perseverance has most definitely paid off with a beautiful creation Lou! 💗
ReplyDeleteOh my, this is so beautiful and intricate, Lou! I love the way the elements on the three separate sides come together so harmoniously to form the gorgeous card front. Love it! xx
ReplyDeleteLovely card Lou. The white space is so effective and I like how you've added the die cut inside as an insert. x
ReplyDeleteThis is beautiful Lou. I love how you have used the dies.
ReplyDeleteThis is stunning Lou! I love that it's a window and it all folds out! Beautiful.
ReplyDelete