Welcome to our April Creating Kindness Design Team blog hop. Our theme this month is techniques. Oh I love a good technique! I can't wait to see what the rest of the team have to show us. This month we also welcome Carolina Evans as our Guest Designer.
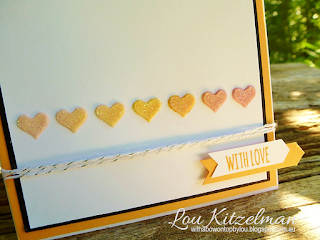
I am currently in what I like to call my 'embossing paste phase'! I made some cards a few weeks ago using the gorgeous Shimmery White embossing paste and some reinkers to get an ombre effect. Lots of you asked me how I did this so I thought I would extend the technique a touch more for our hop. So lets see what I came up with using a technique I am calling 2-for-1 embossing paste stencils.
Can you work out how I did? Stampin' Up! has packs of gorgeous Decorative Masks (a fancy term for stencils) but you can also extend the use of your thinlits, framelits and punches by making your own. If you want to use your stencil several times you can use Window Sheets or acetate to create it like I did with this card. But I had a brainwave and wondered about using cardstock for the stencil which could be used for another card - hence the 2-for-1 name!
You will see this demonstrated much better in my video - link below. I used the strip of hearts from the Mini Treat Bag thinlits to make my 'stencil'. Make it longer than the piece you are stencilling onto so you don't get embossing paste going where you don't want it. Then you just apply the embossing paste, carefully lift off the 'stencil' and you have 2 panels to make into cards. Cool hey!
I am so pleased with how this turned out. Sweet and simple!
Look at the depth you get with the Shimmery White embossing paste!
And the piece I used as a stencil makes a great panel for another card front. I have teamed it with more thinlits from the Mini Treat Bag set plus stamps from the coordinating You're So Sweet set.
While I was on a roll and using up retiring products (farewell Mini Treat Bag thinlits, You're So Sweet and Elegant Eggplant, Peek-a-boo Peach and Sweet Sugarplum everything), I thought I would try the same technique with the stars and silver embossing paste. So hard to photograph - hard to capture shine without a touch of blur. Squint and it looks so much better!
You might like to check out my video which explains this technique so much better.
Now make sure you check out all of the incredible techniques that the rest of the team has to show you. Next up is the amazingly talented Sacha van de Kerkhof.
Product List


These cards are so beautiful! Thanks for showing all the possibillities with embossing paste! xx
ReplyDeleteThank you for expanding my thoughts about using my Paste! Your cards are beautiful.
ReplyDeleteHoly jalepeno! Lou, this is just awesome. The ombre effect is beautiful! I can't wait to try this. TFS :o)
ReplyDelete2-for-1 embossing paste stencils, genius!! don't need to waste anything! and pretty as well. Love it! xxx
ReplyDeleteLovely! Great idea to use the stencil too!
ReplyDelete-Maria
So pretty Lou, love your Ombre technique!! xo
ReplyDeleteWow, Lou! You amaze me with your talent!
ReplyDeleteReally good idea with this card stencil, but does this embossing paste in card die cut when dry?
ReplyDeleteI die cut the cardstock to use as a stencil, then stencil the embossing paste through that, then let it dry. Hope that helps.
Delete