My task today was to make 3 cards but when I sat down I had not one creative idea floating around! That's fine if you are just making a card for fun but today I needed these cards to give to people. Sooooo...what to do? I looked at my crowded craft desk to see what was still out from my last projects. Answer - everything! Most of the items that I had bought from the Stampin' Up! 2015 Holiday Catalogue were laying around. So I just grabbed my Festive Flower builder punch (which I am totally obsessed with btw) and made 3 flowers using Very Vanilla, Crushed Curry and Pink Pirouette. I have some tips on how to use this punch and not waste cardstock here.
My top design tip for you is to just start with one element. It may be an embellishment (like my flower) or a colour scheme, embossing folder, paper etc. Don't get bogged down in the nitty gritty. Just start. The rest will flow. And if it doesn't you have the start of a project for another day!
With flower made I grabbed my class folder with notes from past years, flipped it open and landed on my instructions for centre step cards. Cardstock and DSP choices came next. This is what I came up with.
You can see that they are all variations on one design. Today that was the easiest for me! Don't be afraid to use your favourite ideas/designs as a base for another card. If you are onto a good thing - stick to!
For my sympathy card I used Very Vanilla and Tip Top Taupe for my colour scheme. Dotted lace trim in Tip Top Taupe gave my sentiment (from Petite Pairs) some definition. Venetian crochet trim made leaf like shapes. The front panel was embossed with the Softly Falling Textured Embossing Folder. I love being able to use Christmas products for other occasions. Don't you?
Centre Step Cards have been around for many years but I keep coming back to them. If you have been following my blog you'll know that I love cards that pack flat for sending but stand up for display. These are perfect for that. Here are the side views for you.
I cut another panel and mat for the inside of each card. See measurements below.
These cards are easy to make. Especially if you have a Stampin' Trimmer. You can cut and score the lines on that. Here are my instructions. There are so many variations - this is just one!
My top design tip for you is to just start with one element. It may be an embellishment (like my flower) or a colour scheme, embossing folder, paper etc. Don't get bogged down in the nitty gritty. Just start. The rest will flow. And if it doesn't you have the start of a project for another day!
With flower made I grabbed my class folder with notes from past years, flipped it open and landed on my instructions for centre step cards. Cardstock and DSP choices came next. This is what I came up with.
You can see that they are all variations on one design. Today that was the easiest for me! Don't be afraid to use your favourite ideas/designs as a base for another card. If you are onto a good thing - stick to!
For my sympathy card I used Very Vanilla and Tip Top Taupe for my colour scheme. Dotted lace trim in Tip Top Taupe gave my sentiment (from Petite Pairs) some definition. Venetian crochet trim made leaf like shapes. The front panel was embossed with the Softly Falling Textured Embossing Folder. I love being able to use Christmas products for other occasions. Don't you?
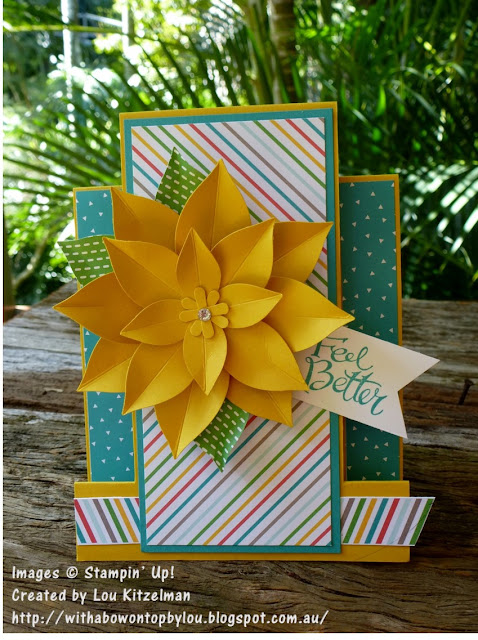
My 'feel better' card has scraps from my Cherry on Top DSP stack. I just placed different patterns on my Crushed Curry base until I was happy with the look. I added 2 strips on the side struts as there was not enough contrast for the flower.
I went to the tried and tested colour scheme of pink and green and chose Pink Pirouette and Garden Green for my third card. Gold cording trim and some paper from the Winter Wonderland DSP pack were added. My sentiment is from the Floral Wings hostess set. It needed something to lift it and make it stand out so I used the Banner Triple punch with a piece of vellum from the Winter Wonderland vellum stack. A piece of Very Vanilla Subtle Stripes Satin ribbon was the finishing touch.
Centre Step Cards have been around for many years but I keep coming back to them. If you have been following my blog you'll know that I love cards that pack flat for sending but stand up for display. These are perfect for that. Here are the side views for you.
I cut another panel and mat for the inside of each card. See measurements below.
These cards are easy to make. Especially if you have a Stampin' Trimmer. You can cut and score the lines on that. Here are my instructions. There are so many variations - this is just one!
Of course my stylist was on hand to "help"! I won't show you the photos of Millie "helping" by lying on my cards. She doesn't really like sharing my attention - even with cards! You should see how she feels about my glitter tray!


Wonderful ideas for this punch. I love it!!! Thanks for the inspiration. And I think Millie is beautiful. My dog Sebastian likes to sit in a chair beside me when I am creating.
ReplyDelete1
Wonderful ideas for this punch. I love it!!! Thanks for the inspiration. And I think Millie is beautiful. My dog Sebastian likes to sit in a chair beside me when I am creating.
ReplyDelete1